Complete guide to Social Token Authentication for Facebook & Instagram
You will need to ensure the following before authenticating for Instagram data on Radarr. Please head to the respective sections if any of the below conditions is not complete –
- STAGE 1
You have access to your company/brand Instagram business page and are an Admin. If not, please follow the steps in section 1 below to create an Instagram Business Profile/Account.
Once complete, please continue to stage 2.
- STAGE 2
You have access to your company/brand Facebook business page and are an Admin. If not, please request your company admin to grant you admin access. Once granted, please check the below condition.
- STAGE 3
You have linked your Instagram Business Profile Account with your Brand/Company Facebook Page.
If not, please follow the steps listed below.
- STAGE 4
You have access to Radarr and can login successfully.
If not, please contact your Account Manager or support@radarr.com to access Radarr.
STAGE 1
Follow the below steps to create an Instagram Business Profile/Account. If you already own and manage one that is associated to your company/brand, you can ignore this stage of instructions and skip to Stage 2
To continue, follow the below steps to get started creating an Instagram Business Profile/Account –
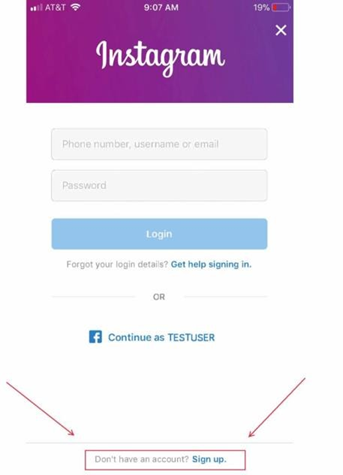
When using a mobile –
- Download the Instagram app from the App Store (iPhone) or Google Play Store (Android).
- Once the app is installed, tap the Instagram icon to open it.
- Tap Sign Up With Email or Phone Number (Android) or Create New Account (iPhone), then enter your email address or phone number (which will require a confirmation code) and tap Next. You
can also tap Log in with Facebook to sign up with your Facebook account.
Please create a fresh account if you intend to use it as your brand/company’s business Instagram account
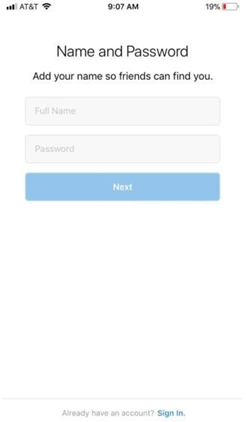
If you register with your email or phone number, create a username and password, fill out your profile info and then tap Done. If you register with Facebook, you’ll be prompted to log into your Facebook account if you’re currently logged out.
When using a computer –
- To create an Instagram account from a computer:
- Go to instagram.com
- Enter your email address, create a username and password or click Log in with Facebook to sign up with your Facebook account.
Please create a fresh account if you intend to use it as your brand/company’s business Instagram account.
- If you register with an email, click Sign up. If you register with Facebook, you’ll be prompted to log into your Facebook account if you’re currently logged out.
- If you sign up with email, make sure you enter your email address correctly and choose an email address that only you or your company representatives can access. If you log out and forget your password, you’ll need to be able to access your email to get back into your Instagram account.
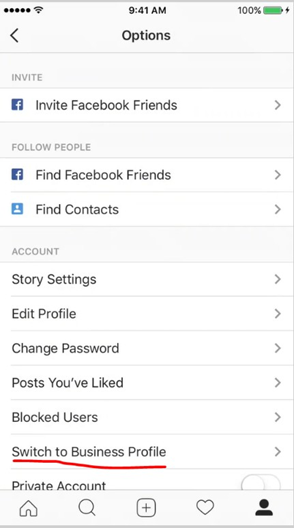
Next steps can only be done via mobile to convert your Instagram profile into a Business Profile/Account
- Go to your profile and tap
- Tap Settings
- Tap Switch to Business Profile
- Tap Done
STAGE 2
You will require a current Facebook page admin to grant you admin access in order to link your Facebook page account with your Instagram Business account.
If you’re an admin:
- Click Settings at the top of your Page.

2. Click Page Roles in the left column.
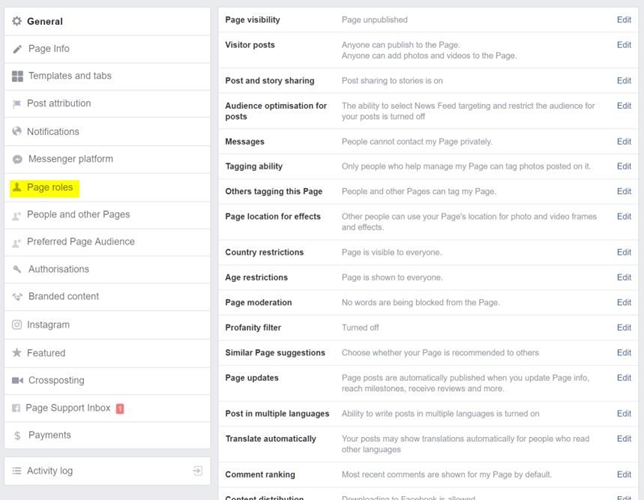
3. Type a name or email in the box and select the person from the list that appears. (The person you require to add as an admin to your page would be required to like and follow your page first in order to appear in this list)
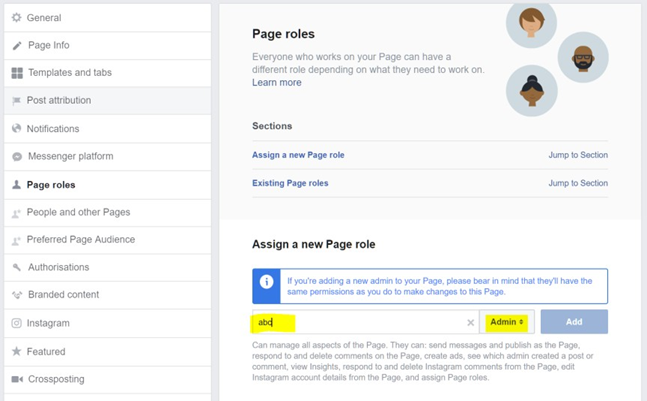
4. Click Admin to select a role from the dropdown menu.
5. Click Add and enter your password to confirm.
6. Keep in mind that if you’re not friends with the person you’re adding, they’ll have to accept your invite before they can start helping you manage your Page.
STAGE 3
These steps will take you through connecting your Instagram Business Profile with your Brand/Company Facebook Page.
This will require to tweak a few settings on both your Instagram and Facebook Business pages.
Please do the steps for connecting your Instagram page to your Facebook page via only the Facebook interface and NOT via Instagram.
On Facebook –
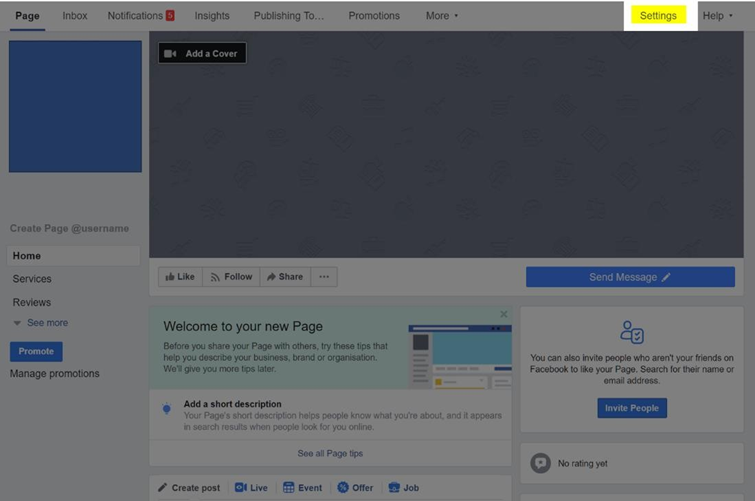
- Go to your Brand/Company Page
- Click on the Settings button at the top right panel of the page
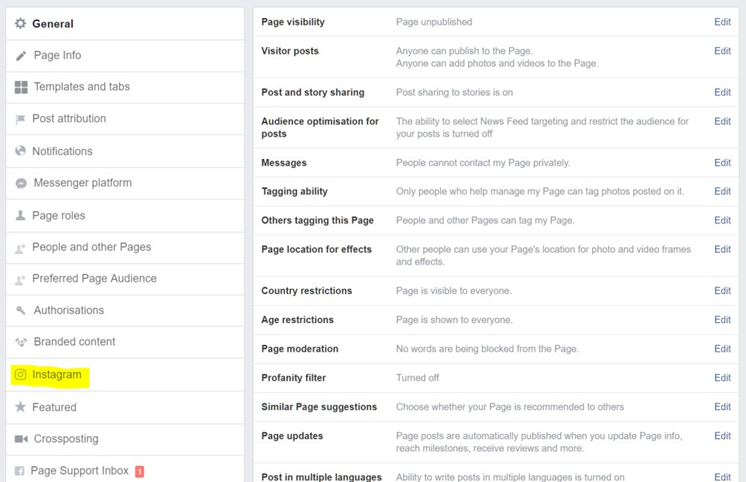
3. In the next page, on the left hand panel of this screen, scroll down to and click on Instagram
4. To add an existing Instagram account to your Facebook Business Page, click on Log In
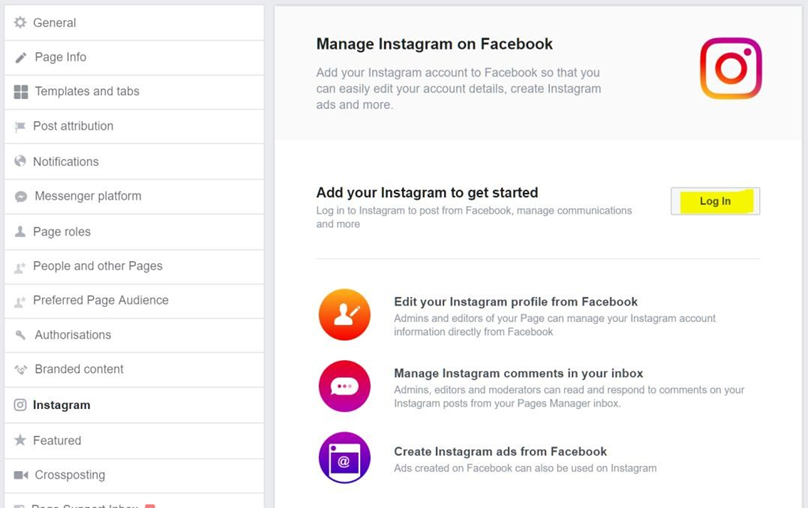
5. Provide your Instagram credentials. Once done, click Log In and you should be able to view details of your Instagram account here.
PLEASE NOTE THAT YOU MAY NEED TO WAIT FOR UPTO 30MINS BEFORE PROVIDING AUTHENTICATION ON RADARR IF YOU JUST NEWLY CREATED YOUR INSTAGRAM PAGE AND JUST LINKED IT TO YOUR FACEBOOK BUSINESS PAGE
STAGE 4
You will now be guided on how to provide authentication for Instagram data via Radarr so you can acquire Instagram data for tracking on Radarr. Proceed to login to Radarr.
Once logged in, please follow the steps below to provide authentication on the Radarr platform –
- Login to your Radarr account at https://app.radarr.com/
- On the left hand side panel click on the ” Social Tokens” button.
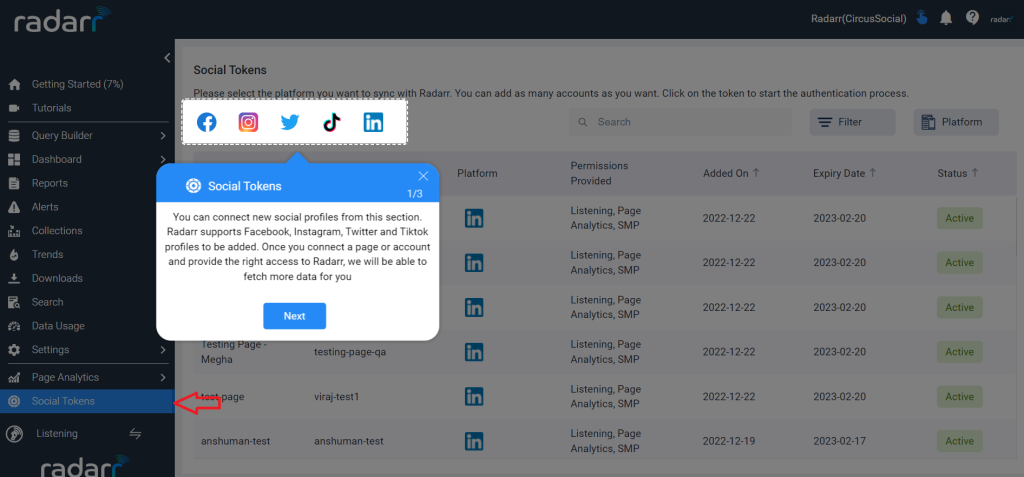
3. Click on the platform icon with which you would like to authenticate.
We have selected Facebook here for authentication. Please enable the permission which you would like to give the authentication based on the requirement.
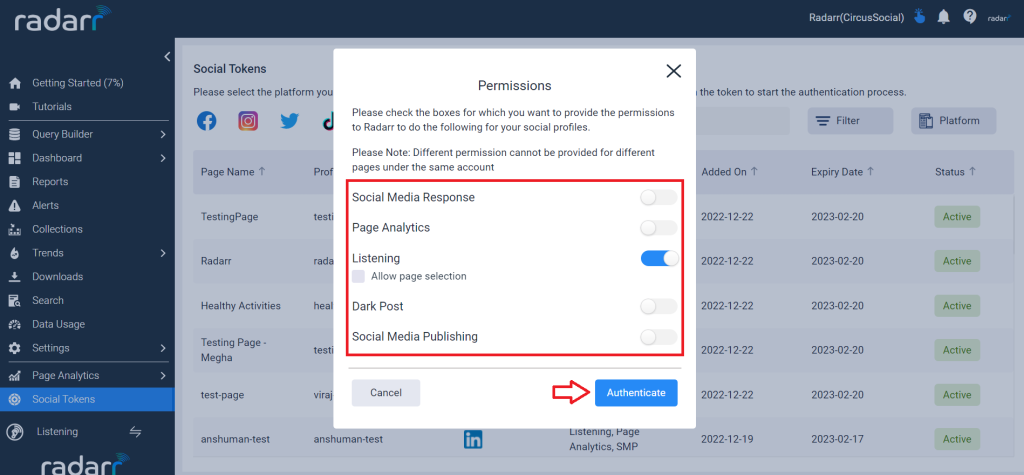
A new window will pop where you will have to provide the credential details and enable all the permission required.
Please accept all incoming steps.
Please ensure you see the “Authorized Successfully” message
You would now have successfully provided authentication.
Note: You will now be able to track 30 hashtags per unique page authentication provided and you will also be able to add the social pages. Authenticate with more unique page tokens to get access to more hashtags for tracking.